 Mr Kidman's Classroom



Revise the key ideas
Recording and exploring
- Looking before naming — Observational drawing starts with the particular subject in front of you. Compare the angle of a leaf, the width of a cup and the spaces between objects rather than drawing a remembered symbol. Observation is a skill developed through repeated looking and checking.
- Choosing a viewpoint — Move around a subject before settling. A low viewpoint can emphasise height; a view from above reveals different surfaces. Record your position or take a reference photograph so you can return to the same view. Ask permission before photographing people.
- Sketchbook investigations — A sketchbook or journal holds observations, experiments, questions and developing ideas. Include quick drawings, colour tests, collected textures and notes about decisions. It need not be a book of polished final pictures: rejected tests can explain a useful discovery.
- Primary and secondary sources — A primary visual source comes from your direct encounter, such as your drawing of a shoe. A photograph made by someone else is a secondary source for your investigation. Record the maker and source, and distinguish your own observations from an image you have adapted.
- Purposeful annotation — Write what you tried, what happened and what you will change. “The close hatching makes this edge darker, so I will use wider gaps near the light” is more useful than “I like it”. Connect comments to visible evidence on the page.
- Exploring alternatives — Try several small thumbnail compositions before a large piece. Change cropping, viewpoint or the placement of the main shape. Compare how each version directs attention. A final idea should develop from tested choices rather than simply being the first idea enlarged.
Line, shape and proportion
- Contour and gesture — Contour lines follow visible edges; a continuous-line drawing keeps the tool on the paper. Gesture drawing uses quick marks to explore movement or overall structure. These approaches answer different questions and can be combined rather than ranked as correct and incorrect.
- Line quality — Pressure, speed, tool angle and material change a line. A light exploratory mark is easy to adjust; a heavy broken line can emphasise roughness. Test a tool before using it and choose marks that help communicate your subject or intention.
- Measuring relative sizes — Compare one visible distance with another: if a cup is roughly twice as tall as it is wide from your viewpoint, use that ratio to check the drawing. Keep your viewing position steady. Relative measurement is a guide, not a reason to ignore the actual subject.
- Angles and alignment — Look for landmarks that line up vertically or horizontally. Hold a pencil at a consistent distance to compare a sloping edge with horizontal. Check the major angles and overall shape before adding small surface details.
- Negative space — Negative space is the space around and between the main shapes. Drawing the gap inside a chair back can reveal that the chair legs are too far apart. Check both the object and its surrounding spaces rather than concentrating only on outlines.
- Shape and form — A shape has two dimensions, such as a circle drawn on a page. Form concerns three-dimensional volume: the space a solid object takes up, such as a sphere. A drawing can suggest form through tone, overlap and perspective even though the paper remains flat.
Tone, texture and space
- Tonal range — Tone describes relative lightness and darkness. Make a scale from the paper's light to a dark mark using gradual changes of pressure or layers. A broad tonal range can clarify form; a deliberately narrow range can suggest mist or a subdued atmosphere.
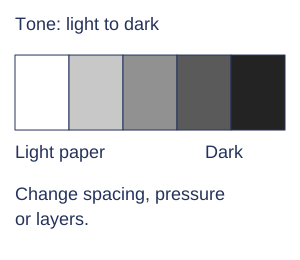
A five-step illustrative tone scale from light paper to a dark mark. Full-size diagram - Light on a form — Identify a light source before shading. A rounded object usually changes gradually from light towards shade; a flat surface may have a more even tone, meaning similar lightness or darkness across it. Compare the observed tones rather than outlining every change with a hard dark border.
- Cast and form shadows — A form shadow lies on the surface turned away from the light. A cast shadow falls where an object blocks light from another surface. The cast shadow's direction helps show the light position and can make an object seem to rest on a table.
- Hatching and cross-hatching — Hatching uses sets of lines to build tone; cross-hatching adds lines in other directions. Closer spacing and additional layers generally darken the area. Follow a surface's direction when useful, and keep lighter areas open rather than filling everything equally.
- Stippling and blending — Stippling builds tone from dots. Blending softens transitions by spreading a suitable drawing material. These are choices of surface effect, not shortcuts to accurate observation. Keep enough differences between light and dark to retain the intended form.
- Actual and implied texture — Actual texture is a surface you could feel, such as rough paper. Implied texture is suggested by marks, such as short broken strokes representing bark. Compare pattern, spacing and direction; one repeated zigzag cannot describe every rough surface.
- Overlap and scale — When one shape interrupts another, overlap can suggest which is nearer. Repeated similar objects drawn smaller can suggest distance. Their size only indicates depth when the objects and context make the comparison plausible.
- One-point perspective — In a one-point perspective construction, parallel edges running away from you in one main direction appear to meet at a vanishing point on the horizon, the line at the viewer’s eye level. Front-facing horizontal and vertical edges stay horizontal and vertical. This is a useful model for a straight corridor, not a rule that all lines meet in one point.
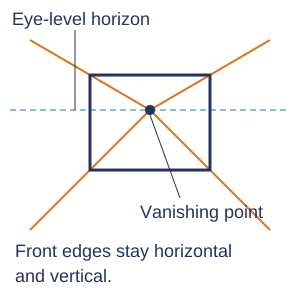
Schematic one-point perspective: receding edges meet on the eye-level horizon; front edges keep their directions. Full-size diagram - Ellipses and viewpoint — A circular rim usually appears as an ellipse when viewed at an angle. Look at how wide and shallow it appears; do not draw a pointed almond. The ellipse changes when the viewpoint changes, so use the observed view rather than one memorised template.
- Depth beyond perspective — Placing an object higher on the ground surface in the picture, overlap, changes of scale and contrast affected by the air between you and the object can all suggest depth. Atmospheric effects depend on conditions; distant objects are not always blue. Some artists intentionally flatten space to serve a different purpose.
Faraway objects may have less clear detail and weaker differences between light and dark because we look through more air.
Refining a personal response
- Cropping and focal point — Cropping selects what is included at the edges of an image. A focal point is an area that attracts attention through contrast, detail, placement or direction. Make a small test to check whether the viewer is drawn to the intended part.
- Imagination informed by observation — Direct observation can support an invented outcome: study leaf structures, then combine them into an imaginary plant. Record the changes and explain their purpose. Creative work can transform a source without pretending that an invented plant is a scientific record.
- Review and revisit — Compare a later drawing with an earlier one using one thing to check, such as whether parts are the right size compared with each other or whether marks express the intended feeling. Identify a successful decision and a change to test. Improvement comes from making and evaluating the revised version, not simply writing that it will be better.