 Mr Kidman's Classroom



Revise the key ideas
Wood properties and planning
- Wood and grain — Timber has grain and responds to moisture. It may shrink, swell, twist or split as conditions change. Select the specified species, grade and section for the task; appearance alone does not establish structural suitability. Acclimatisation and suitable storage reduce movement, but do not make wood dimensionally unchanging.
Acclimatisation lets timber adjust towards the conditions where it will be used, following the specified storage and handling arrangements.
- Stock and defects — Check length, width, thickness, straightness, knots, splits, decay and damage. A defect near a joint or fixing can matter more than one in a non-critical offcut. Store timber supported and dry as required. Reject or seek approval for unsuitable stock rather than cutting around a defect without checking the remaining dimensions.
- Boards and engineered products — Plywood uses bonded veneers, MDF uses bonded fibres and OSB uses oriented strands. Grades differ in structural, moisture and surface performance. Do not use an interior board in an exposed situation simply because its thickness matches. Dust from timber and boards requires effective controls and suitable handling.
A veneer is a thin sheet of wood. MDF means medium-density fibreboard; OSB means oriented strand board, whose wood strands are arranged in layers.
- A practice stud frame — A supervised practice task may use a sole plate at the bottom, a head plate at the top, vertical studs and intermediate noggins. A door lining and architrave may be fitted where the approved practice design requires. This is an example for learning, not the live NEA brief or a structural building design.
A door lining forms the frame around the door opening. Architrave is the trim covering the junction between that lining and the surrounding wall.
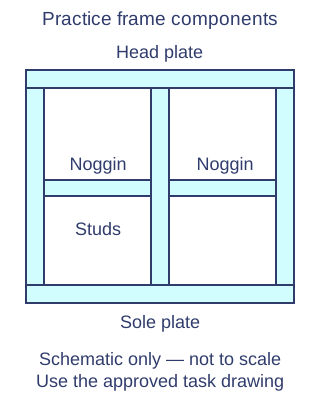
Original teaching schematic. Read with the explanation; not a construction specification. - Resources and controls — A tape or rule measures length; a try square checks and marks right angles; a saw cuts; clamps restrain; an appropriate driver installs specified fixings. Select and inspect tools and supports before starting. Guards and extraction must be used as trained. Do not use unfamiliar powered tools without authorisation.
Measuring, cutting and assembly
- Datum faces — Choose a reliable face and edge and mark consistently from them. Measuring each new piece from the previous cut piece can accumulate error. Mark the waste side clearly and check the drawing's units. A careful second check before cutting costs less than replacing a component cut too short.
- Cutting plans — Kerf is material removed by a saw cut. Two 600 mm pieces require more than exactly 1,200 mm of stock if a cut separates them and ends need trimming. Lay out the cuts with the actual tool allowance and defect positions. The longest available stock does not automatically produce the least waste.
- Square cuts and restraint — Secure the material using the taught setup, keep hands clear and cut on the correct side of the line. The work must not rock or close onto the blade unexpectedly. Check the cut face for square and dimension after cutting. A long piece needs adequate support on both sides appropriate to the method.
- Joint selection — Butt joints may use specified screws, nails or other connections; more developed joints may be appropriate in other designs. Use the approved detail and fixing lengths. Adhesive needs compatible surfaces, application and curing conditions. More adhesive or longer screws do not automatically make a safer joint.
A butt joint brings the plain end or edge of one piece against another piece. Its suitability depends on the specified connection, material and load.
- Pilot holes and fixing — A suitable pilot hole can reduce splitting, especially near ends, when required by the fixing detail. A countersink allows an appropriate screw head to sit as intended. Keep components aligned while fixing; overdriving can crush fibres or weaken the connection. Follow the specified screw and tool guidance rather than applying one rule to every fixing.
- Checking square — After checking opposite sides and right-angle arrangement, compare diagonals of a rectangular frame: unequal diagonals show it is out of square. Adjust before permanent fixing and recheck. Equal diagonals alone do not prove every arbitrary four-sided shape is a rectangle; use the complete set of checks.
- Studs and noggins — Check plate lengths, stud positions, spacing, line, plumb and noggin fit against the drawing. A component forced into a gap can distort the frame. Intermediate checks identify errors before lining hides them. Do not notch or drill structural members without an approved detail.
Plumb means vertical; level means horizontal. They are separate checks, so a frame can meet one requirement while failing the other.
- Door lining and trim — Where included in a practice task, check the opening and lining for size, square and plumb. Trim such as architrave covers the junction around a lining but does not correct an inaccurate structural opening. Follow the taught fixing sequence and specified clearances; a neat mitre is only one aspect of a functional result.
A mitre joins angled cut ends to form a corner. A neat-looking corner does not establish that the opening or lining has the correct dimensions.
Finish, safety and evaluation
- Finishing surfaces — Remove sharp edges and prepare surfaces using the taught tools and dust controls. Work with suitable grain direction and abrasion sequence. Choose compatible treatments where specified, allowing drying or cure. Filling a joint gap may improve appearance but does not establish that the underlying joint has adequate strength.
- Woodworking safety — Use the task assessment, appropriate extraction, inspected equipment and selected PPE. Keep hair, clothing and jewellery clear of machinery. Gloves are not suitable for every rotating-machine task because of entanglement risks; follow the taught equipment-specific controls. Stop and isolate through the authorised procedure before addressing a fault.
PPE means personal protective equipment, such as the eye or hearing protection selected for the particular task. Its selection and use must follow the taught controls.
- Offcuts and cleanup — Retain usable labelled offcuts safely, remove projecting fixings as instructed and segregate waste. Coated or treated timber may need a different disposal route from clean wood. Use the approved dust collection method rather than dispersing fine dust into the air. Leave tools stored and access routes clear.
- Evidence and improvements — Record cut dimensions, square, joint fit, alignment, finish, time and waste against the practice brief. Explain a particular cause, such as measuring from inconsistent edges, and a remedy such as using a common datum. Supervised practical observation is needed to assess safe technique and assembly; answering vocabulary questions is supporting evidence only.
Measuring, cutting and assembly
- Check a joint — For a supervised frame task, check both diagonals after checking the specified side lengths and joint fit. Equal diagonals support a rectangular layout when the intended opposite sides and connections are also correct; they do not prove every dimension meets the drawing. A butt joint locates one end against another surface, while a rebate provides a step for location. Select the specified fixing or adhesive for the material and loading; extra glue cannot compensate for a poorly fitting or incorrectly sized joint.


